Summary
AI upscaling estimates higher-resolution detail from a lower-resolution source. It can make soft footage look clearer, but it cannot guarantee an artifact-free 4K result. Inspect the finished video for halos, flicker, and altered textures.
- An upscaler is a super-resolution model trained on millions of low-resolution / high-resolution pairs. It predicts what sharp edges, skin, fabric and text should look like at higher resolution.
- For images it rebuilds texture in one frame. For video it must also keep motion consistent, or the result flickers.
- For AI video, iterating at 720p and upscaling only the final take is usually cheaper and better than paying for high-resolution generation on every roll.
- To avoid artifacts: start from the sharpest source, preview the hardest moment first, match the model to your footage, and export at a high bitrate.
 What Are Your Ideas Today?
Ready to check your footage? Try Topaz Video Upscaler in Everypixel
The effect of AI upscaling is easy to see in a still image. In the example below, a 500 × 750 portrait was enlarged to 1000 × 1496 pixels using Everypixel Image Upscaler. The enhanced version shows more defined hair strands, facial contours, and powder textures.
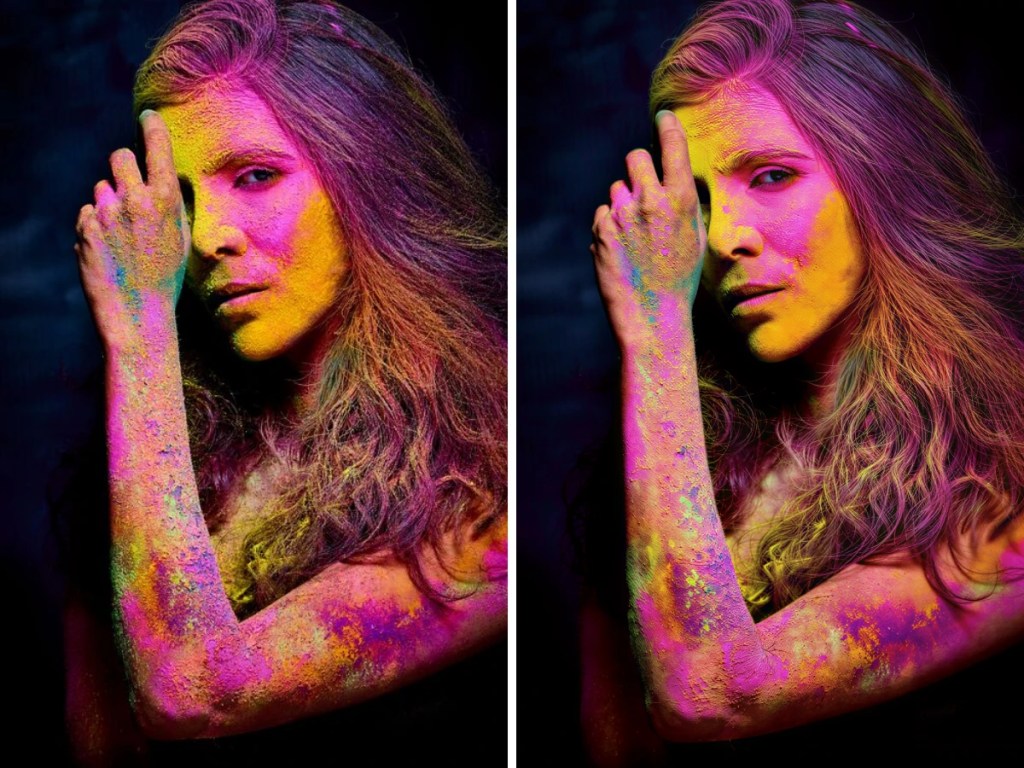
Before and after image enhancement with Everypixel Image Upscaler. The original 500 × 750 image (left) was enlarged to 1000 × 1496 pixels (right), revealing more defined hair strands, facial features, and powder textures.
The same principle applies to video, but with an additional challenge: enhanced details must remain consistent across moving frames. A single image can look sharp after processing, while a video may still show flickering textures or unstable edges during playback.
For a moving-video example, consider two frames from a seven-second clip of a tabby kitten swimming through sunlit water. The source clip is 1280 × 704 pixels at 24 fps, and the second frame was processed with Topaz Video Upscaler. The enhanced image shows more clearly defined whiskers, fur around the ears, and reflections in the water. A paused frame, however, cannot show whether these details stay consistent during playback.


Original video frame (top) and Topaz Video Upscaler result (bottom). The processed frame shows more visible detail in the kitten’s fur, whiskers, and water reflections. The source clip is 1280 x 704 pixels; the output video resolution is 4k.
Most AI video models generate at 720p or 1080p. Runway generates in 720p and treats 4K as a separate Upscale step — creative work at lower resolution, 4K as finishing.
That creates a familiar problem. A clip looks perfect in a small preview and falls apart on a large screen — faces turn waxy, text softens, compression blocks appear. Stretching it in an editor makes it bigger, not better.
AI upscaling is the alternative. Done well, it restores detail and removes artifacts. Done badly, it invents plastic skin and halos. This guide explains what upscalers are, how they work with images and video, why generating cheaply and upscaling once is smarter, and how to do it step by step — including Topaz Video Upscaler inside Everypixel.
What is an AI upscaler, really?
An upscaler increases resolution and the question is how it fills in new pixels.
Traditional upscaling — bicubic, bilinear, Lanczos — averages neighboring pixels. At 110–130% that is fine. At 2x–4x it produces blurred edges, lost texture and banding.
AI upscaling, or super resolution, works differently. A neural network is trained on millions of paired examples: the same scene at full resolution and at reduced resolution. It learns what a sharp edge, a pore, a brick or a letterform should look like at higher resolution.
When you feed it a new frame, it analyzes edges, smooth areas, patterns and texture, and predicts what higher-resolution detail would be consistent with them. New pixels come from that prediction, not from averaging.
Adobe describes the same idea for video: instead of stretching pixels, an AI enhancer analyzes footage frame by frame and reconstructs missing detail from patterns learned on millions of high-quality videos.
That matters for AI video, which often has plausible motion but soft texture. There is a limit: an upscaler reconstructs plausible detail, it does not recover information never captured. Best results come from a clean source too small for its display size.
Where upscalers are used
| Use case | What gets upscaled | Why |
| AI images | Still images from Midjourney, DALL-E, Flux | Removes soft, plastic look; prepares images for print and large display |
| AI video | Clips from Sora, Kling, Veo, Runway, Seedance | Turns 720p/1080p generations into 4K masters for TV, cinema and YouTube |
| Streaming | YouTube, Netflix, Twitch | ~90% of streamed content is 1080p or lower, displays are 4K |
| Gaming | Frames rendered below display resolution | DLSS / FSR render at fewer pixels for frame rate, then reconstruct with AI |
| Restoration | VHS, old phone clips, compressed video | Rebuilds detail lost to compression and low bitrate |
| Social / commerce | Product clips, ads, cropped vertical video | Enlarged crops need detail simple resizing cannot provide |
For creators the common path is row two: generate, upscale in the same workspace, then publish.
How AI upscaling works with images
Modern models are super-resolution convolutional networks, best known as ESRGAN — a generator produces upscaled images while a discriminator tries to distinguish them from real photos. Perceptual and adversarial losses push the output to look convincing — sharp edges, natural texture, readable text. Large images are split into overlapping tiles and blended.
The result is intentional generation: upscaling a brick wall 4x adds cracks and mortar a high-resolution camera would have captured. That is why it can look sharper than the original — and why at 8x–16x it looks artificial.
Practical rule: upscale from the best source and check faces and text at 100% first.
How AI upscaling works with video
Video adds one hard requirement: consistency over time. Inventing a different texture on every frame causes flicker and boiling edges. Video upscalers work frame by frame, with temporal awareness.
Topaz Labs analyzes each frame for edges, textures and motion, then reconstructs detail rather than scaling what is there. NVIDIA’s RTX Video Super Resolution predicts the residual image — the difference between a traditionally upscaled frame and what it should look like — and superimposes it, correcting blockiness, ringing and banding in a single pass.
Temporal stability is best evaluated during playback: added textures can shimmer or change between frames even when a paused image looks sharp. The two real split-screen comparisons in Step 5 show changes in apparent clarity across city and mountain footage. They are not a controlled test of temporal consistency.
Model choice determines artifacts:
Faithful models sharpen and clean what is in the shot without inventing. Faces and text stay true. Best for interviews, product and camera footage. Topaz calls this Proteus.
Reconstruction models rebuild detail never captured — hair, skin texture, fabric weave. Built for soft or heavily compressed footage. Topaz calls this Starlight. Push too far and skin turns waxy.
Creative models reinterpret the frame and add new texture for a hyper-detailed look. Topaz calls this Astra; Adobe Firefly offers Precise vs. Creative. Effective on AI-generated video, but it is a look, not a copy.
Motion is the other failure point: when estimation fails on fast pans or overlapping people, you get ghosting. Preview the fastest moment.
Why generate cheap and upscale once is cheaper and often better
Native high-resolution generation is expensive because cost scales with pixel count. Rendering 4K needs about 4x the compute of 1080p. Many models offer no native 4K at all, so insisting on 4K means paying for expensive generation and an upscaler.
Separating creation from finishing removes both costs. Runway is explicit: outputs are created in 720p, 4K comes from Upscale. Composition, motion and performance are visible at 720p. A 4K premium on a failed roll does not make it good; it makes rejecting it expensive. Cheap iteration lets you test more ideas.
Workflow:
1. Iterate cheap at 720p (or 480p Draft) until the take is right.
2. Upscale the keeper once to 1080p, 1440p or 4K for delivery.
For models without native 4K, upscaling is not just cheaper. It is the only way.
How to upscale AI video to 4K without artifacts: step by step
Step 1. Start from the sharpest clip you can make
Upscaling adds detail; it cannot save a bad shot. Generate the final take at the model’s highest resolution — typically 1080p — even if you iterated at 720p. Keep the file clean: no extra compression, no re-exports through messaging apps.
Before moving on: watch the source at 100% on a large screen. If faces, hands or text are already broken at 1080p, fix the generation first.
Step 2. Choose the model that matches your footage
- Interviews, product, camera footage: faithful model.
- Soft AI footage, heavily compressed clips: reconstruction model.
- Stylized, hyper-detailed look: creative model, knowing it will reinterpret the frame.
- Anime / CGI: model trained for clean edges and flat color.
Unsure? Run the same preview through two models where difference on faces and edges is usually obvious.
Step 3. Preview the hardest moment first
Before committing to a full 4K render, preview 2–5 seconds of the most demanding footage: a close-up, thin objects in motion, small text, fast camera movement, or a reflective surface. The kitten comparison above provides a useful example. Check whether the whiskers and fur remain natural, whether ripples in the water develop halos or artificial patterns, and whether the enhancement stays stable from frame to frame.
Inspect the entire preview while it plays, then compare matching frames at the same display size. A sharp screenshot is useful for checking details, but it cannot reveal flicker or changing textures across the clip.
Step 4. Set resolution and export for delivery
Match output to display size: 4K for full-screen/TV/masters, 1080p for social/web. Export H.265 at high bitrate, or ProRes if you will keep editing.
Step 5. Compare, then finish
Compare the original and enhanced footage side by side at the same playback size. Examine the kitten’s whiskers and the reflections in the water in the still-frame example above, then watch the moving landscape and city comparisons below for changes in edge detail and texture. Do not judge quality by sharpness alone: look for halos, ghosting, flicker, or altered features, and keep the source file unchanged.
Two side-by-side footage comparisons
The two split-screen clips show original footage (left) and enhanced footage (right). Both are 1080 × 608-pixel previews at 30 fps, not 4K masters. Compare visible detail while watching for motion artifacts.
Example 1. Mountain landscape: rocks, ridges, and vegetation
The mountain clip makes natural textures easy to compare. Look at rocky slopes, ridge lines, and foreground grasses. The enhanced side has clearer edges; watch for shimmering vegetation and invented texture.
Mountain landscape footage before (left) and after (right) AI upscaling. The enhanced side shows more defined rocky textures, mountain ridges, and vegetation. The split-screen preview is 1080 × 608 pixels, not a 4K export.
Example 2. Night city: illuminated edges and fine detail
The city clip pairs bright windows and streetlights with dark buildings and trees. Compare illuminated edges and distant details, and watch for halos, ringing, or flickering textures.
Nighttime city footage before (left) and after (right) AI upscaling. The enhanced side shows clearer building outlines, illuminated windows, and finer details in trees and street-level structures. This is a 1080 × 608-pixel comparison preview rather than a 4K master.
These examples show changes in visible detail, not a guarantee of better quality in every frame. Before calling an export 4K, inspect its file properties and review the entire clip at the intended display size.
Common mistakes that create artifacts
| Mistake | Result | Fix |
| Upscaling 480p / compressed source | Blocks remain, faces melt | Start from 1080p keeper |
| Creative model on real footage | Faces redrawn, text altered | Faithful model for camera footage |
| Over-sharpening | Dark halos, crunchy texture | Lower sharpening |
| Skipping preview | Waxy skin after long render | Preview hardest 2–5 sec first |
| Low-bitrate export | Detail collapses, banding returns | H.265 high bitrate or ProRes |
| 4K for a small player | No gain, wasted credits | Match resolution to display |
Topaz Video Upscaler: upscale your AI video to 4K inside Everypixel
For a 4K export, open Topaz Video Upscaler under Apps in Everypixel. This browser-based tool accepts MP4 clips up to 30 seconds from your device or Assets, including generated footage and camera recordings. You can choose among three Topaz models and target 720p, 1080p, 1440p, or 4K. The original clip remains in your library.
Choose the Topaz model for your footage
Proteus 4: A conservative first choice for camera footage, interviews, product shots, and clips where recognizable faces or logos should change as little as possible.
Starlight Precise 2.6: Reconstructs fine detail in soft AI-generated or heavily compressed footage. Inspect close-up faces because the enhancement may change facial features.
Astra 2: Produces a more stylized, high-detail interpretation. Choose it for a deliberate visual treatment rather than strict preservation of the source.
How to upscale with Topaz Video Upscaler
1. Select your MP4. In Apps, open Topaz Video Upscaler and click Select, choose a clip from Assets, or upload an MP4 of up to 30 seconds. Trim the source first if you only need a short section.
2. Choose a model and 4K output. Match the Topaz model to your footage, then choose 4K as the target resolution (1080p is the default). Start by testing a short, difficult section: a face, fine hair, reflections, or moving edges.
3. Generate, inspect, and download. Review the credit cost shown on Generate before starting. Play the result at full size and check it in motion before clicking Download. The exported video uses H.265/HEVC; confirm its actual pixel dimensions in file properties.
The illustration below maps the controls in Everypixel’s Topaz Video Upscaler. It shows where to add a source clip, select an enhancement model, choose 4K, and generate the output. The cat-in-the-pool preview is a sample input image within this visual guide. It is an interface illustration, not a verified 4K export or an additional performance test.

Step-by-step Topaz Video Upscaler workflow in Everypixel: upload a source video, choose a model such as Proteus 4, select 4K output, and generate the final upscaled version. The illustration uses a sample cat-in-the-pool clip to show how the process looks inside the interface.
Topaz Video Upscaler uses credits on the Starter and Pro plans; the amount is shown before generation. It creates a new output without replacing the source video.
| Everypixel Video Upscaler | Everypixel Topaz Video Upscaler | Standalone Topaz Video | Adobe Firefly (Topaz Astra) | |
| Max output | 1440p | 4K | 4K / 8K | 4K |
| Best for | AI clips, 1080p/1440p delivery | True 4K, AI + camera | Long-form, batch, offline | Creative Cloud users |
| Model choice | Automatic | Proteus 4 / Starlight 2.6 / Astra 2 | 10+ models | Precise / Creative |
| Workflow | Inside Everypixel | Inside Everypixel | Desktop install | Inside Firefly |
| Cost | Free pool, then credits | Starter / Pro credits | Subscription | Subscription / credits |
The main point: upscale the keeper, not every roll
Generate and iterate at 720p, where failed rolls are cheap. Upscale only the final take to the size it will be shown at. You pay the premium once, keep more options open, and — for models without native 4K — take the only path to a 4K master. Start sharp, preview the hardest moment, match the model, export high.
Sources
- NVIDIA Blog: RTX Video Super Resolution
- NVIDIA Developer Blog: Enhancing Low-Resolution SDR Video with the NVIDIA RTX Video SDK
- Ars Technica: Nvidia’s New AI Upscaling Tech Makes Low-Res Videos Look Sharper in Chrome, Edge
- Adobe Firefly: Topaz Astra Video Upscaling
- Adobe Firefly: Video Quality Enhancer
- Topaz Labs: Creative Video Upscaler
- Topaz Labs: AI Video Enhancer
- Runway Help: Can I Generate Videos in 4K?
- UniFab: AI Video Model Comparison: Quality, Cost, Speed, and 4K Upscaling
- Everypixel: AI Video Upscaler
- Everypixel Help: Upscale Video to Higher Resolution
- Everypixel: Topaz Video Upscaler
FAQ
What is an AI upscaler?
A super-resolution model that reconstructs detail instead of stretching pixels, trained on millions of low/high-resolution pairs. For video it works frame by frame with temporal awareness.
How does it work with images vs. video?
Images: rebuild texture in one frame (CNNs, GANs like ESRGAN). Video: the same reconstruction must stay consistent across frames, using motion analysis and residual correction to avoid flicker and halos.
Why is generate-low-then-upscale cheaper?
Cost scales with pixels — UniFab puts Sora 2 at ~7x more for 1080p than 720p, with no native 4K. Iterating at 720p keeps failed rolls cheap; upscaling only the keeper pays the premium once.
How do I upscale to 4K without artifacts?
Start from the sharpest 1080p keeper, match the model to your footage, preview faces, hands, text and fast motion first, and export H.265 at high bitrate or ProRes.
What resolution should I choose?
1080p for social/web, 1440p for large monitors, 4K for full-screen, TV and masters. Beyond display size there is no visible gain.
What is the difference between Topaz Video Upscaler and Video Upscaler?
Topaz Video Upscaler in Everypixel lets you choose Proteus 4, Starlight Precise 2.6, or Astra 2 and upscale to 4K. It accepts MP4 clips up to 30 seconds and uses credits on Starter and Pro plans. The simpler Video Upscaler automatically enhances clips to a maximum of 1440p, without model selection.
Can upscaling fix a bad generation?
No. It cannot invent a good shot. If faces or composition are wrong at 720p, they will be wrong and larger at 4K. Iterate until the take is right, then upscale the keeper.